Now I present to you:
How to Make a French Hood: a Tutorial
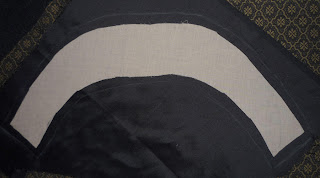
1. The shape of the paste, the crescent that defines the headpiece, is vastly personal, as it must fit your head's size and shape. It is best to use a scrap piece of fabric to trace your pattern on so that you may make the necessary adjustments, whether it be wider, longer on the sides, a bit shorter at the crown, or anything that suits your fancy. My goal was to get the shape and length as close to Anne's portrait as I could.2. Using your adjusted pattern, trace your front and back fabrics with a quarter inch seam allowance. I chose the trumpet sleeve fabric for the front and black silk for the back.
3. Trace your pattern onto buckram or another sturdy base fabric. I found an incredibly stiff felt to use that worked amazingly.
4. Carefully bend a piece of wire around the outside of the base. These two components will give the paste its lift and form. Stitch the wire into place and gently shape the piece to your liking.
5. Pin the front and back fabrics right sides together, carefully securing a length of ribbon on the back, bottom corners. These will tie the piece in place beneath your hair. Stitch along the outside seams, leaving the bottom edge open. Clip corners and flip right-side out, slipping the fabric over the form and pinning in place. Close the bottom seam by hand.
6. Once the paste is covered, it's time to decorate, or add the "billaments." I opted for two rows of faux pearls, mimicking Anne Boleyn's French hood.
7. The crepine: after hemming the edge, accordion pleat wired, gold ribbon, an inch wide, basting as you go to hold in place. This thread will be removed from the final piece.
8. Securely stitch the hemmed edge to the corner of the paste. Continue along the length of the ribbon, stitching the top of each pleat to the base. Cut and hem ribbon at the opposite corner and remove basting thread.
9. Voila! Your hood is complete (well, technically you would have the veil, which is the actual "hood" portion of the French hood, but I'm not going to wear one, so as far as this tutorial is concerned, your piece is done. Congrats!).
And for your general viewing pleasure, the "B" necklace:


Well done !Congrats to you.
ReplyDeleteHi! I have that exact same trim, and every time I do like you said you did, the trim buckles and spirals. How did you get past this??
ReplyDeleteI'm assuming you're referring to step 8. My trim just wouldn't stay where I wanted it either, so at the top of each pleat, I stitched it once to the very edge of the paste and again a quarter inch in. This way, it wasn't pivoting on one thread.
ReplyDeleteI hope that helps. Some of the buckling flattened out once I put it on. I would love to see it once it's finished. Good luck!
Awesome, thankyou!
ReplyDeleteThankyou so much for posting this! Just did a tudor costume in four days, including inventing the dress pattern, and i think if i hadn't found this my friend-and-relation would've had to manage without a headdress.
ReplyDeleteI found a printable pattern at http://www.elizabethancostume.net/headwear/fhoodmake.html
which was a big help, but your instructions were much easier to follow - thanks especially for the lovely clear photos.
I used black panne velvet and stiffened it with craft foam, which is easy to cut, sew and handle (they sell it for kids to muck around with). It had just the right amount of stiffness and is very light.
To pleat the ribbon i ran two lines of small, even, matched, running stitches along the top and bottom edge, as if i meant to smock it, pulled it tight, squeezed it hard, and let it out to the right length. I stitched through the *base* of every fourth or fifth pleat only, and i found it looked best if i let the ribbon sit on the edge of the paste (is that the right word?) rather than sewing it edge-to-edge. To make sure it stayed neat after it left my posession, i ran a length of gold thread through the outer edge of the pleats before removing the front gathering thread.
I wanted a veil, and just in case anyone else wants one too, this is how i did it: I took a headscarf-sized triangle of black chiffon, deeply rounded its square corner, and roll-hemmed the resulting curve and about 3" at the ends of the straight edge, using the overlocker . I didn't hem the whole of the straight edge, because i wanted to keep its stretch. Then i safety-pinned the straight edge along the inside of the paste, centering it carefully. Lastly i put it on and tied the veil as you would tie a headscarf, but quite loosely.
It looked amazingly like the picture i was copying, so thank you again!
I really loved your tutorial!Can you do one for the "B" necklace as well?
ReplyDelete