- It's hard to eat oatmeal with trumpet sleeves.
- Wheely office chairs and full skirts do not mix.
- You feel awesome when you're dressed up as Anne Boleyn.

10.29.2010
Project 7: Anne Boleyn Gown
The day has finally come, and I'm sitting here in my full Anne Boleyn regalia. Of course, I have misplaced my camera, hence the lack of recent posts. Thus far in my day, I have learned the following things:
10.14.2010
Playing Catch Up
I took yesterday afternoon off from work, namely to spend it sitting at the tire store for three hours while they searched for the proper replacement for my flat. I did, however, get what seemed like a bonus hour of afternoon time which I lent to beginning Tudors Season Four marathon. The final season, which came out on DVD Tuesday and is essentially the reason I got a flat tire as I cut the curb too tightly in my excitement to enter the Best Buy parking lot, has been outstanding thus far. Season Three, with the absence of my favorite queen, Anne Boleyn (I'm sure you all guessed that one), seemed sparse, boring, and too full of blood and guts. Do I watch for the blood and guts? No, though I have enjoyed the war bits thus far this season. It certainly has kept me captivated.
How far did I get in the first sitting, you ask? Oh, just through episode nine.
Yes, I watched nine episodes in one night. Sweet biscuits, what is wrong with me? That leaves the finale for me to enjoy tonight, with its much talked about revisits from wives one through three. So excited.
At least I can say that I finished my underskirt while watching. See, I was still productive.
10.07.2010
Project 7: Anne Boleyn Gown - Part Six - French Hood
Hello, blog. It feels so good to sit here with Rosewood Buttons after a short hiatus. My calendar has been filled with jury duty, training our new PR girl at work, and a weekend trade show that was about as exciting as a trip to the dentist. While I have been unable to write, I have been busy with the Anne Boleyn costume, keeping right on track with the nearing Halloween deadline. The French hood is, do do dooo, finished! As is the immensely important "B" necklace. This leaves the kirtle and foresleeves, which the fabrics were purchased for this week.
Now I present to you:
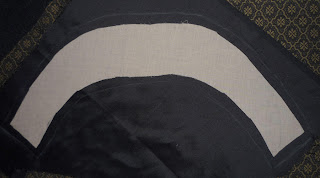 2. Using your adjusted pattern, trace your front and back fabrics with a quarter inch seam allowance. I chose the trumpet sleeve fabric for the front and black silk for the back.
3. Trace your pattern onto buckram or another sturdy base fabric. I found an incredibly stiff felt to use that worked amazingly.

4. Carefully bend a piece of wire around the outside of the base. These two components will give the paste its lift and form. Stitch the wire into place and gently shape the piece to your liking.

5. Pin the front and back fabrics right sides together, carefully securing a length of ribbon on the back, bottom corners. These will tie the piece in place beneath your hair. Stitch along the outside seams, leaving the bottom edge open. Clip corners and flip right-side out, slipping the fabric over the form and pinning in place. Close the bottom seam by hand.

6. Once the paste is covered, it's time to decorate, or add the "billaments." I opted for two rows of faux pearls, mimicking Anne Boleyn's French hood.

7. The crepine: after hemming the edge, accordion pleat wired, gold ribbon, an inch wide, basting as you go to hold in place. This thread will be removed from the final piece.

8. Securely stitch the hemmed edge to the corner of the paste. Continue along the length of the ribbon, stitching the top of each pleat to the base. Cut and hem ribbon at the opposite corner and remove basting thread.

9. Voila! Your hood is complete (well, technically you would have the veil, which is the actual "hood" portion of the French hood, but I'm not going to wear one, so as far as this tutorial is concerned, your piece is done. Congrats!).
And for your general viewing pleasure, the "B" necklace:


Now I present to you:
How to Make a French Hood: a Tutorial
1. The shape of the paste, the crescent that defines the headpiece, is vastly personal, as it must fit your head's size and shape. It is best to use a scrap piece of fabric to trace your pattern on so that you may make the necessary adjustments, whether it be wider, longer on the sides, a bit shorter at the crown, or anything that suits your fancy. My goal was to get the shape and length as close to Anne's portrait as I could.
3. Trace your pattern onto buckram or another sturdy base fabric. I found an incredibly stiff felt to use that worked amazingly.

4. Carefully bend a piece of wire around the outside of the base. These two components will give the paste its lift and form. Stitch the wire into place and gently shape the piece to your liking.

5. Pin the front and back fabrics right sides together, carefully securing a length of ribbon on the back, bottom corners. These will tie the piece in place beneath your hair. Stitch along the outside seams, leaving the bottom edge open. Clip corners and flip right-side out, slipping the fabric over the form and pinning in place. Close the bottom seam by hand.

6. Once the paste is covered, it's time to decorate, or add the "billaments." I opted for two rows of faux pearls, mimicking Anne Boleyn's French hood.

7. The crepine: after hemming the edge, accordion pleat wired, gold ribbon, an inch wide, basting as you go to hold in place. This thread will be removed from the final piece.

8. Securely stitch the hemmed edge to the corner of the paste. Continue along the length of the ribbon, stitching the top of each pleat to the base. Cut and hem ribbon at the opposite corner and remove basting thread.

9. Voila! Your hood is complete (well, technically you would have the veil, which is the actual "hood" portion of the French hood, but I'm not going to wear one, so as far as this tutorial is concerned, your piece is done. Congrats!).
And for your general viewing pleasure, the "B" necklace:


10.01.2010
Subscribe to:
Posts (Atom)